


二、OpenStack云平台架构设计
云平台架构设计 (Openstack No.2)
2.1 私有云平台总体规划简介
该架构采用1+2+3模式,在VMware创建6个虚拟机即一个Controller节点、两个Compute节点和三个Ceph存储节点。将使用Ceph后端存储来改善OpenStack的swift存储的缺点构建基础设施服务云平台,使OpenStack成为Ceph的客户端。
每个节点拥有两张网卡100网段作为每个节点的内网通讯管理网段,200网段为外网服务网段,OpenStack环境信息照表3.1所示,Ceph环境节点信息如表3.2所示。
表 2.1 OpenStack 环境信息
| 主机名 | 外网网卡 (IP/掩码, 网关) | 内网网卡 (IP/掩码) | 操作系统 | 内存 | CPU | 硬盘 |
|---|---|---|---|---|---|---|
| Controller | 192.168.200.10/24, GW:192.168.200.2 | 192.168.100.10/24 | CentOS 7.5 | 3G | 4 | 60G |
| Compute1 | 192.168.200.20/24, GW:192.168.200.2 | 192.168.100.20/24 | CentOS 7.5 | 2G | 2 | 40G |
| Compute2 | 192.168.200.30/24, GW:192.168.200.2 | 192.168.100.30/24 | CentOS 7.5 | 2G | 2 | 40G |
表 2.2 Ceph 环境信息
| 主机名 | 外网网卡 (IP/掩码, 网关) | 内网网卡 (IP/掩码) | 操作系统 | 内存 | CPU | 硬盘 |
|---|---|---|---|---|---|---|
| Ceph1 | 192.168.200.40/24, GW:192.168.200.2 | 192.168.100.40/24 | CentOS 7.5 | 1G | 1 | 20G × 2 |
| Ceph2 | 192.168.200.50/24, GW:192.168.200.2 | 192.168.100.50/24 | CentOS 7.5 | 1G | 1 | 20G × 2 |
| Ceph3 | 192.168.200.60/24, GW:192.168.200.2 | 192.168.100.60/24 | CentOS 7.5 | 1G | 1 | 20G × 2 |
2.2 基础服务准备
配置yum源、设置hosts、关闭防火墙、安全模块,OpenStack的三个节点都需要修改配置。
2.2.1 配置
[root@controller ~]# vi /etc/selinux/config #将配置文件改为SELINUX=disabled
[root@controller ~]# systemctl stop firewalld
[root@controller ~]# systemctl disable firewalld
Removed symlink /etc/systemd/system/multi user.target.wants/firewalld.service.
Removed symlink /etc/systemd/system/dbus-org.fedoraproject.FirewallD1.service.
2.2.2 配置本地yum源
上传所需要的centos和mitaka镜像并在controller节点,并创建挂载镜像所需的文件夹,最后将镜像挂载到所创建的文件夹内,查看挂载如图2.1所示。
[root@controller ~]# mkdir /opt/{yum,centos,mitaka}
[root@controller ~]# mv /etc/yum.repos.d/* /opt/yum
[root@controller ~]# mount /root/CentOS-7-x86_64-DVD-1804.iso /opt/centos/
mount: /dev/loop0 is write-protected, mounting read-only
[root@controller ~]# mount /root/Mitaka.iso /opt/mitaka/
mount: /dev/loop1 is write-protected, mounting read-only
[root@controller ~]# df -h #查看挂载情况
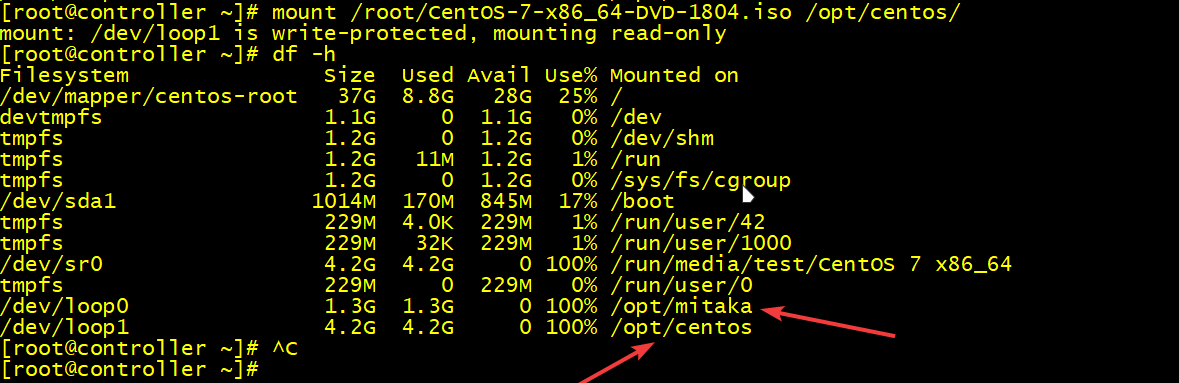
图2.1 挂载情况
设置controller的yum源如图2.2所示。
[root@controller ~]# vi /etc/yum.repos.d/local.repo
[centos]
name=centos
gpgcheck=0
enabled=1
baseurl=file:///opt/centos/

[mitaka]
name=mitaka
gpgcheck=0
enabled=1
baseurl=file:///opt/mitaka/Openstack-Mitaka
[root@controller ~]# vi /etc/yum.repos.d/local.repo
[centos]
name=centos
gpgcheck=0
enabled=1
baseurl=file:///opt/centos/

[mitaka]
name=mitaka
gpgcheck=0
enabled=1
baseurl=file:///opt/mitaka/Openstack-Mitaka
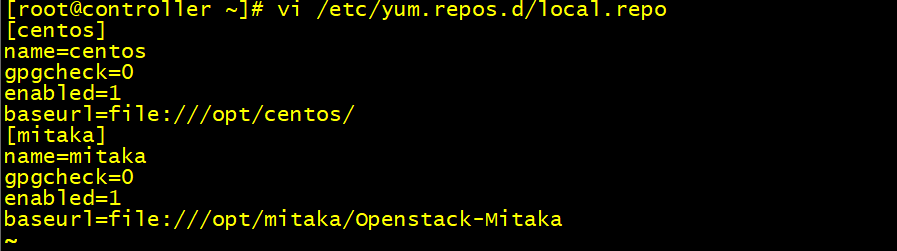
图2.2 yum源
设置compute的两个节点配置的yum源,配置命令两个控制节点一致。
[root@compute1和2 ~]# vi /etc/yum.repos.d/local.repo
[centos]
name=centos
gpgcheck=0
enabled=1
baseurl=ftp://controller/centos

[mitaka]
name=mitaka
gpgcheck=0
enabled=1
baseurl=ftp://controller/mitaka/Openstack-Mitaka
[root@compute1和2 ~]# vi /etc/yum.repos.d/local.repo
[centos]
name=centos
gpgcheck=0
enabled=1
baseurl=ftp://controller/centos

[mitaka]
name=mitaka
gpgcheck=0
enabled=1
baseurl=ftp://controller/mitaka/Openstack-Mitaka
2.2.3 配置hosts
[root@controller ~]# vi /etc/hosts
192.168.100.10 controller
192.168.100.20 compute1
192.168.100.30 compute2
192.168.100.40 ceph1
192.168.100.50 ceph2
192.168.100.60 ceph3
#这里6个节点都需要安装配置情况如图2.3所示
[root@controller ~]# vi /etc/hosts
192.168.100.10 controller
192.168.100.20 compute1
192.168.100.30 compute2
192.168.100.40 ceph1
192.168.100.50 ceph2
192.168.100.60 ceph3
#这里6个节点都需要安装配置情况如图2.3所示
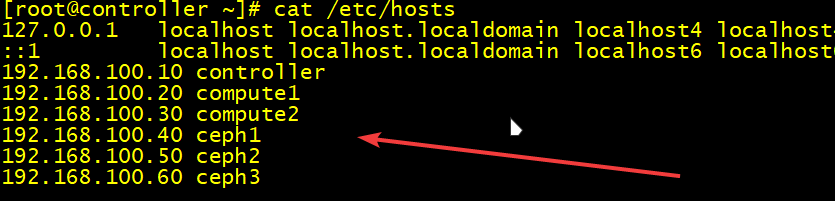
图2.3 hosts
2.2.4 控制节点安装ftp服务
安装ftp服务Controller节点作为ftp服务器使得其余节点可以访问ftp文件。安装并配置ftp文件,添加开机自启。
[root@controller ~]# yum -y install vsftpd
[root@controller ~]# vi /etc/vsftpd/vsftpd.conf
#打开ftp配置文件
#首行添加anon_root=/opt,如图4.4所示配置文件
[root@controller ~]# systemctl start vsftpd
[root@controller ~]# systemctl enable vsftpd
#添加开机自启

[root@controller ~]# yum -y install vsftpd
[root@controller ~]# vi /etc/vsftpd/vsftpd.conf
#打开ftp配置文件
#首行添加anon_root=/opt,如图4.4所示配置文件

[root@controller ~]# systemctl start vsftpd
[root@controller ~]# systemctl enable vsftpd
#添加开机自启
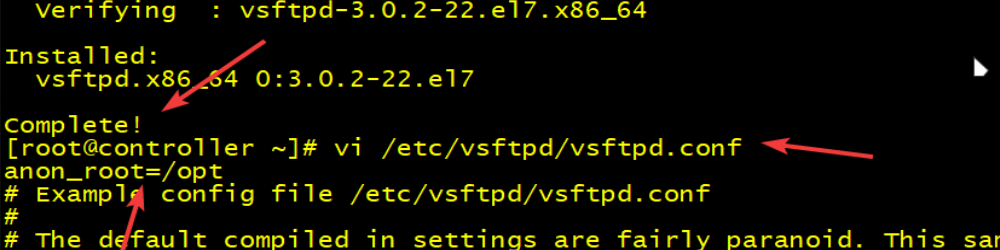
图2.4 配置目录 hosts

阅读建议