


七、OpenStack的Neutron网络服务安装
7.1 Neutron网络服务(OpenStackNo.7)
Neutron作为OpenStack的网络服务组件,作用就是将网络设备资源虚拟化。后续实例资源的网络通信都需要Neutron来进行服务,支持多种虚拟网络设备例如网卡、路由器等等。
7.1.1 控制节点部署
7.1.1.1 创建数据库授权
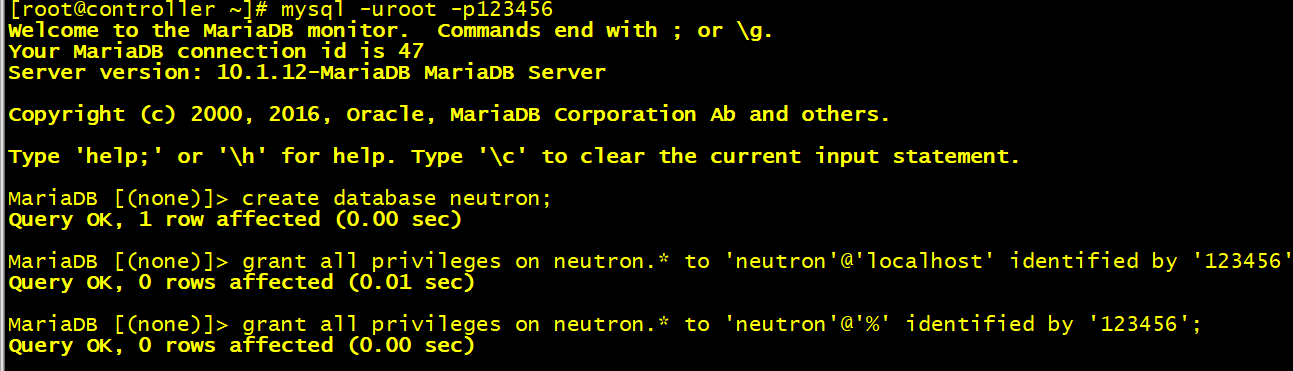
在控制节点登录数据库创建neutron网络服务需要的数据库和角色,创建结果如图7.1所示。
7.1.1.2 创建服务证书、用户、API端点
[root@controller ~]# openstack user create --domain taoism --password 123456 neutron
[root@controller ~]# openstack role add --project service --user neutron admin
[root@controller ~]# openstack service create --name neutron --description "OpenStack Networking" network
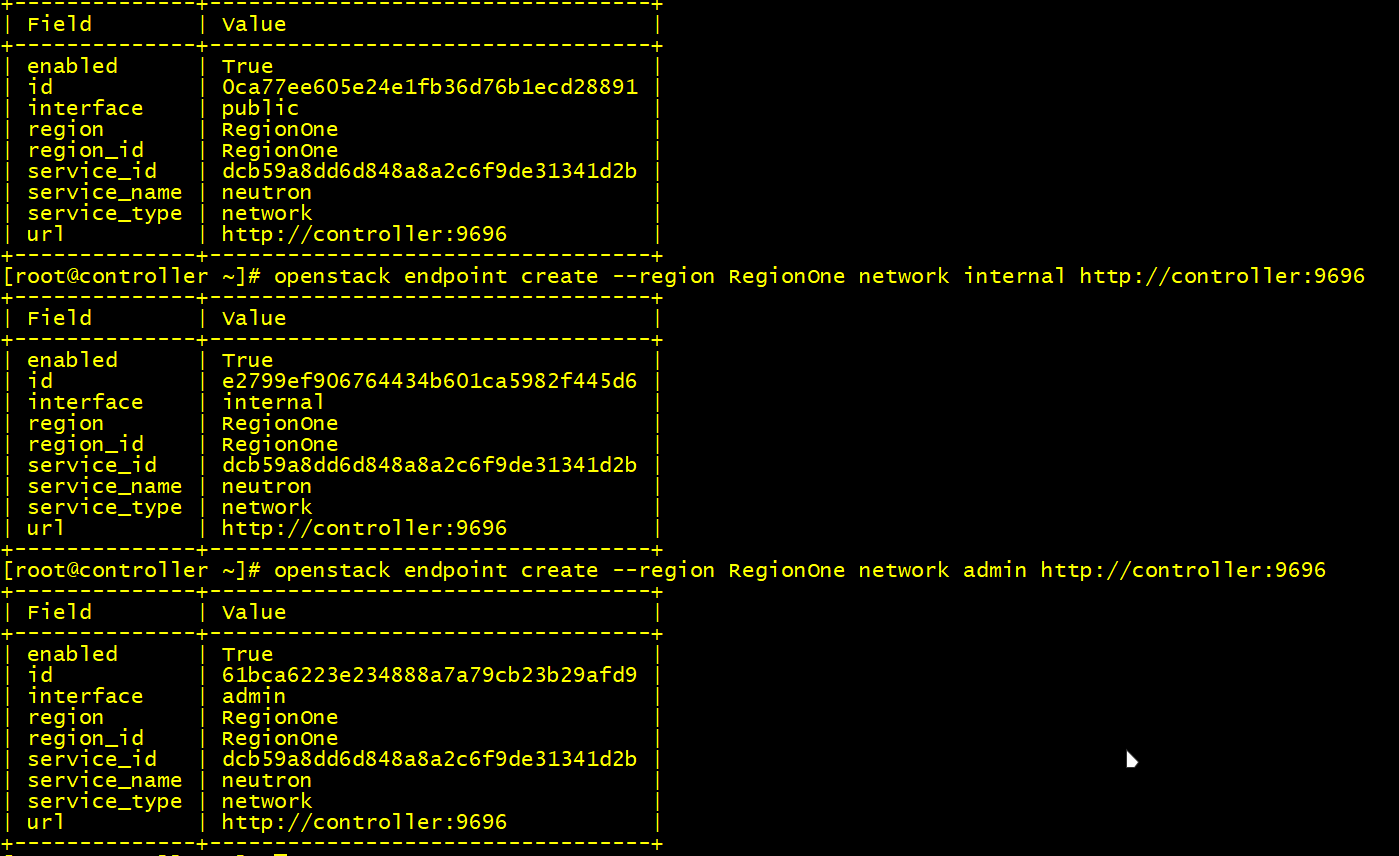
[root@controller ~]# openstack endpoint create --region RegionOne network public http://controller:9696
[root@controller ~]# openstack endpoint create --region RegionOne network internal http://controller:9696
[root@controller ~]# openstack endpoint create --region RegionOne network admin http://controller:9696
[root@controller ~]# openstack user create --domain taoism --password 123456 neutron
[root@controller ~]# openstack role add --project service --user neutron admin
[root@controller ~]# openstack service create --name neutron --description "OpenStack Networking" network
[root@controller ~]# openstack endpoint create --region RegionOne network public http://controller:9696
[root@controller ~]# openstack endpoint create --region RegionOne network internal http://controller:9696
[root@controller ~]# openstack endpoint create --region RegionOne network admin http://controller:9696
如图7.2所示。
7.1.1.3 安装neutron服务
[root@controller ~]# yum -y install openstack-neutron openstack-neutron-ml2 openstack-neutron-linuxbridge ebtables

[root@controller ~]# yum -y install openstack-neutron openstack-neutron-ml2 openstack-neutron-linuxbridge ebtables
7.1.1.4 编辑neutron.conf配置文件
[root@controller ~]# vi /etc/neutron/neutron.conf
[DEFAULT] 下添加
core_plugin = ml2
service_plugins = router
allow_overlapping_ips = True
rpc_backend = rabbit
auth_strategy = keystone
notify_nova_on_port_status_changes = True
notify_nova_on_port_data_changes = True

[database] 下添加
connection = mysql+pymysql://neutron:123456@controller/neutron

[oslo_messaging_rabbit] 下添加
rabbit_host = controller
rabbit_userid = openstack
rabbit_password = 123456

[oslo_concurrency] 下添加
lock_path = /var/lib/neutron/tmp

[keystone_authtoken] 下添加
auth_uri = http://controller:5000
auth_url = http://controller:35357
memcached_servers = controller:11211
auth_type = password
project_domain_name = taoism
user_domain_name = taoism
project_name = service
username = neutron
password = 123456
在[nova]下添加参数如下图7.3所示。
![图7.3 [nova].png](/upload/%E5%9B%BE4.37%20%5Bnova%5D.png)
7.1.1.5 编辑ml2_conf.ini配置文件
[root@controller ~]# vi /etc/neutron/plugins/ml2/ml2_conf.ini
[ml2] 下添加
type_drivers = flat,vlan,vxlan,gre,local
tenant_network_types = vxlan
mechanism_drivers = linuxbridge,l2population
extension_drivers = port_security

[ml2_type_flat] 下添加
flat_networks = provider

[ml2_type_vxlan] 下添加
vni_ranges = 1:1000

[securitygroup] 下添加
enable_ipset = True
7.1.1.6 编辑linuxbridge_agent.inilayer-3配置文件
[root@controller ~]# vi /etc/neutron/l3_agent.ini
[DEFAULT] 下添加
interface_driver = neutron.agent.linux.interface.BridgeInterfaceDriver
external_network_bridge =
[root@controller ~]# vi /etc/neutron/l3_agent.ini
[DEFAULT] 下添加
interface_driver = neutron.agent.linux.interface.BridgeInterfaceDriver
external_network_bridge =
7.1.1.7 编辑linuxbridge_agent.ini配置文件
[root@controller ~]# vi /etc/neutron/plugins/ml2/linuxbridge_agent.ini
[linux_bridge] 下添加
physical_interface_mappings = provider:ens33

[securitygroup] 下添加
enable_security_group = True
firewall_driver = neutron.agent.linux.iptables_firewall.IptablesFirewallDriver

[vxlan] 下添加
enable_vxlan = True
local_ip = 192.168.100.10
l2_population = True
7.1.1.8 编辑dhcp_agent.iniDHCP配置文件
[root@controller ~]# vi /etc/neutron/dhcp_agent.ini
[DEFAULT] 下添加
interface_driver = neutron.agent.linux.interface.BridgeInterfaceDriver
dhcp_driver = neutron.agent.linux.dhcp.Dnsmasq
enable_isolated_metadata = True
[root@controller ~]# vi /etc/neutron/dhcp_agent.ini
[DEFAULT] 下添加
interface_driver = neutron.agent.linux.interface.BridgeInterfaceDriver
dhcp_driver = neutron.agent.linux.dhcp.Dnsmasq
enable_isolated_metadata = True
7.1.1.9 编辑metadata_agent.ini配置文件
[root@controller ~]# vi /etc/neutron/metadata_agent.ini
[DEFAULT] 下添加
nova_metadata_ip = controller
metadata_proxy_shared_secret = 123456
[root@controller ~]# vi /etc/neutron/metadata_agent.ini
[DEFAULT] 下添加
nova_metadata_ip = controller
metadata_proxy_shared_secret = 123456
7.1.1.10 编辑nova.conf配置文件
[neutron]下添加
url = http://controller:9696
auth_url = http://controller:35357
auth_type = password
project_domain_name = taoism
user_domain_name = taoism
region_name = RegionOne
project_name = service
username = neutron
password = 123456
service_metadata_proxy = True
metadata_proxy_shared_secret = 123456
7.1.1.11 初始化neutron并同步数据库并重启nova-api服务
[root@controller ~]# ln -s /etc/neutron/plugins/ml2/ml2_conf.ini /etc/neutron/plugin.ini
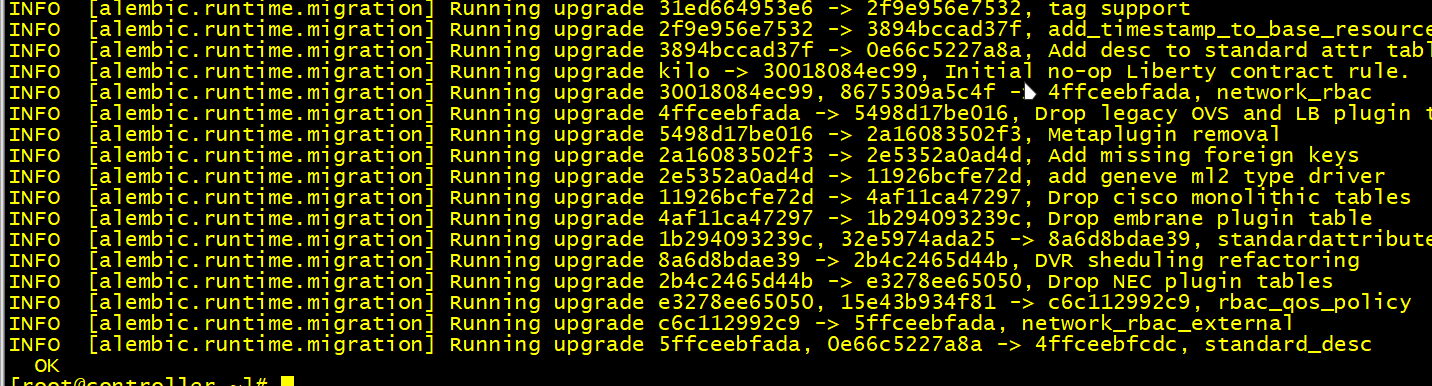
[root@controller ~]# su -s /bin/sh -c "neutron-db-manage --config-file /etc/neutron/neutron.conf --config-file /etc/neutron/plugins/ml2/ml2_conf.ini upgrade head" neutron
#如图7.4数据库同步所示
[root@controller ~]# systemctl restart openstack-nova-api.service
[root@controller ~]# ln -s /etc/neutron/plugins/ml2/ml2_conf.ini /etc/neutron/plugin.ini
[root@controller ~]# su -s /bin/sh -c "neutron-db-manage --config-file /etc/neutron/neutron.conf --config-file /etc/neutron/plugins/ml2/ml2_conf.ini upgrade head" neutron
#如图7.4数据库同步所示
[root@controller ~]# systemctl restart openstack-nova-api.service
7.1.2 计算节点部署
7.1.2.1 安装软件包
yum -y install openstack-neutron-linuxbridge ebtables ipset

yum -y install openstack-neutron-linuxbridge ebtables ipset
7.1.2.2 编辑neutron.conf配置文件
vi /etc/neutron/neutron.conf
[DEFAULT]下添加
rpc_backend = rabbit
auth_strategy = keystone

[oslo_concurrency]下添加
lock_path = /var/lib/neutron/tmp

[oslo_messaging_rabbit]下添加
rabbit_host = controller
rabbit_userid = openstack
rabbit_password = 123456

[keystone_authtoken]下添加
auth_uri = http://controller:5000
auth_url = http://controller:35357
memcached_servers = controller:11211
auth_type = password
project_domain_name = taoism
user_domain_name = taoism
project_name = service
username = neutron
password = 123456
7.1.2.3 编辑linuxbridge_agent.ini配置文件
vi /etc/neutron/plugins/ml2/linuxbridge_agent.ini
[linux_bridge]
physical_interface_mappings = provider:ens33   #网卡名字是当时基础配置时的外网网卡

[vxlan]
enable_vxlan = True
local_ip = 192.168.100.20/30
l2_population = True

[securitygroup]
enable_security_group = True
firewall_driver = neutron.agent.linux.iptables_firewall.IptablesFirewallDriver
7.1.2.4 编辑nova.conf配置文件
vi /etc/nova/nova.conf
[neutron]
url = http://controller:9696
auth_url = http://controller:35357
auth_type = password
project_domain_name = taoism
user_domain_name = taoism
region_name = RegionOne
project_name = service
username = neutron
password = 123456
vi /etc/nova/nova.conf
[neutron]
url = http://controller:9696
auth_url = http://controller:35357
auth_type = password
project_domain_name = taoism
user_domain_name = taoism
region_name = RegionOne
project_name = service
username = neutron
password = 123456
7.1.2.5 重启Linuxbridge
systemctl restart openstack-nova-compute.service neutron-linuxbridge-agent.service
systemctl enable neutron-linuxbridge-agent.service

systemctl restart openstack-nova-compute.service neutron-linuxbridge-agent.service
systemctl enable neutron-linuxbridge-agent.service
7.1.3 控制节点验证服务
[root@controller ~]# . /root/admin-openrc
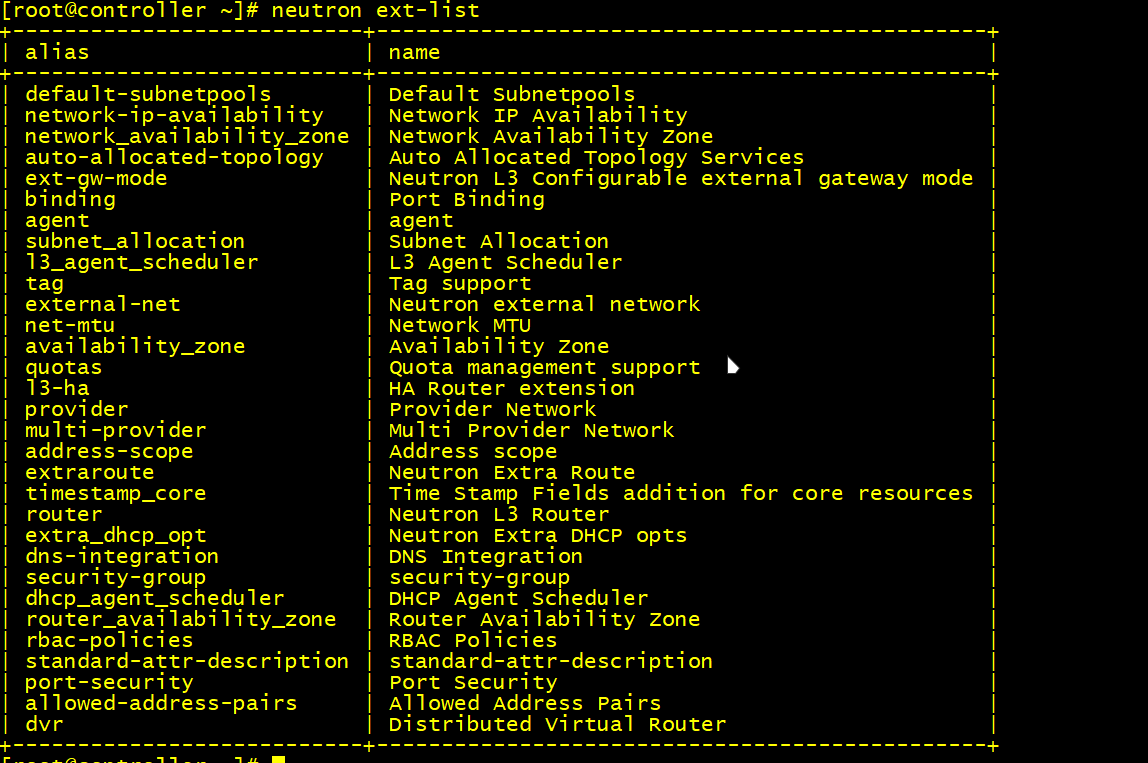
[root@controller ~]# neutron ext-list
#如图7.5查看neutron 的ext列表
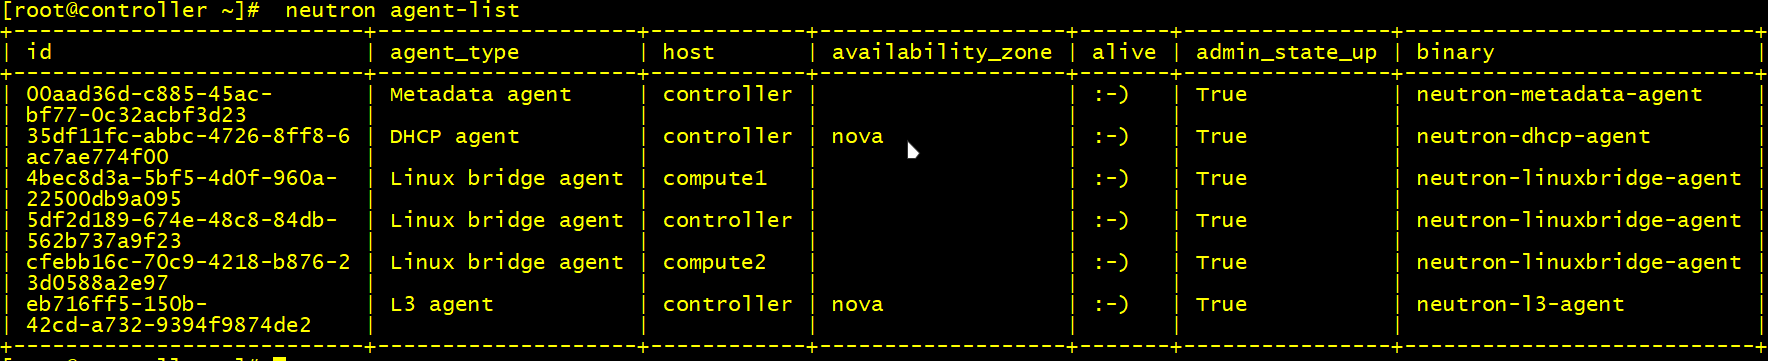
[root@controller ~]# neutron agent-list
#如图7.5查看neutron客户端的状态列表
[root@controller ~]# . /root/admin-openrc
[root@controller ~]# neutron ext-list
#如图7.5查看neutron 的ext列表
[root@controller ~]# neutron agent-list
#如图7.5查看neutron客户端的状态列表
OpenStack搭建教程第六节今天到这里,可以看看前面几节内容。
一、云计算和OpenStack
二、OpenStack云平台架构设计
三、安装部署OpenStack所需基础软件包
四、OpenStack的Keystone认证服务
五、OpenStack的Glance镜像服务安装
六、OpenStack的nova计算服务
精品推荐
Ambari大数据管理平台搭建教程

阅读建议